


As we approach the final projects in our 12 Projects of Christmas feature, we’re focusing on quality, longevity and that all-important finishing touch. After all, Christmas dinner without the gravy just doesn’t hit the same.
The 12 Projects of Christmas
From elf-budget upgrades to full-on Santa-level transformations, every project has showcased what you can do with a little imagination and the right products. As we start wrapping up, here’s a reminder that the final touches make a difference…
Professional trims that protect your building long after the holidays
If Santa’s sleigh is landing on your garage, garden room or extension roof this Christmas, first impressions count. While a watertight EPDM membrane does all the heavy lifting, it’s the roof edge trim that locks everything in place, creating a secure seal, protecting the membrane and giving the roof its clean, eye-catching finish.
Roofing is an artform. If you’re going to do it, do it properly – and round off your fine workmanship with a cutting-edge trim that’s the icing on the cake for any flat roof waterproofing or EPDM replacement project.
🎄 Why Edge Trim Belongs in the Waterproofing Stage
Flat roof edge trim isn’t just decorative it plays a crucial role in performance.
When installed alongside a new EPDM membrane, edge trim:
- Traps and secures the membrane at the perimeter
- Helps create a reliable, long-lasting seal
- Protects against wind uplift
- Directs rainwater safely away from the roof
- Prevents water tracking beneath the membrane
Best fitted during a roof replacement – not after – trim is the finishing detail that completes the system, delivering aesthetic appeal and total waterproofing peace of mind.
🏠 The Project: A Garage or Garden Room Roof – Done Properly
This project is ideal if you’re:
- Replacing an ageing felt roof
- Upgrading to EPDM for the first time
- Re-waterproofing a tired flat roof
- Planning a long-term fix rather than a short-term patch
By installing the EPDM membrane and edge trim together, you create a roof that’s neat, secure and built to last for decades.
🎁 What You Need
A complete system, not just a single component.
- EPDM rubber membrane (cut to size)
- Flat roof edge trim (size matched to your roof layout) and drip trim
- Adhesive and sealant (as specified)
- Fixings for the trim system, including trim clips and corners
- Measuring tape, drill and basic tools
- Dry weather for sound installation
Think of EPDM as Rudolph, leading the way, while the essential accessories are the rest of the reindeer -working together in perfect harmony to deliver a roof system that performs, protects and lasts.
But the good news is, you don’t have to wait for a Christmas miracle – you can order the EPDM, adhesives, sealant, trim system and fixings quickly and easily in a full flat roof kit – right here at PermaRoof.
🛠️ How to Do It
We like to keep things logical, straightforward and system-led – no Christmas chaos required. And if you do need a helping hand along the way, we’ve got a full video tutorial and a sleigh-load of installation guides waiting in our resource library to guide you through every step.
Step 1: Strip back the old covering
Start by removing the existing felt or membrane, then give the roof deck a thorough check. It should be sound, clean and completely dry before you continue. If there’s any oil, grease or old adhesive residue left behind, a solvent-free cleaner or degreaser will do the trick and help ensure the best long-term performance.
When installing PermaRoof standard trim, we recommend fitting the gutter edge backplate before adhering the membrane to the deck. ** Refer briefly to step 4 before fitting membrane if attaching drip / gutter trims.
Step 2: Position the EPDM membrane
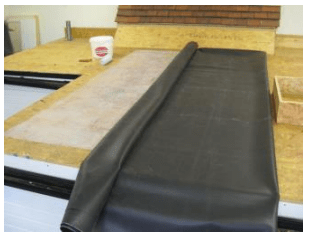
Lay out the membrane and allow it to relax before bonding. This should take around 30 minutes, so just enough time to ponder any last-minute gifts over a cup of tea.
Step 3: Glue down the membrane
Fold back half of the membrane and apply the adhesive.
Whether adhesive is applied to both the membrane and the deck, or just the deck, will depend on your installation method, project size, substrate and adhesive type. Some substrates – such as concrete – will need priming first, while ply or OSB boards won’t.
If you’re using contact adhesive, it offers an instant grab, so you can continue with the installation straight away. For water-based adhesive, wait until it becomes tacky to the touch and leave at least 100mm around all perimeter edges. These edges should then be bonded using roll-on or spray contact adhesive.
Top tip: If temperatures dip below 5°C – or freezing conditions are expected within 48 hours – swap water based deck adhesive for bonding (contact) adhesive to avoid any winter woes.
Once the adhesive is ready, roll the folded membrane back over the substrate, brushing or rolling out any air bubbles as you go. Then repeat the process on the other half of the roof.
 Step 4: Trim Time – Trim & Gutter Installation Guide
Gutter Edge Trim
** Begin by fitting the gutter edge backplate before adhering the membrane.
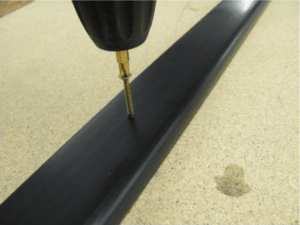
Fix it in place using 40mm self-tapping screws at 500mm centres, positioning the fixings neatly in the recess of the backplate. Starting with the trim flat on the deck will make final attachment much easier, and it’s important that the top of the backplate sits flush with the deck surface.
Membrane & Drip Plate
Once the membrane has been applied, trim it so it overhangs the gutter edge by 50mm. Slide the top edge of the drip plate beneath the backplate lip, securely trapping the membrane between the two. Tap the drip plate into place until it clicks firmly home.
To avoid damaging the trim, use a short length of batten and a hammer or rubber mallet for controlled force – never strike the drip plate directly.
Kerb / Perimeter Trim
Measure and cut the kerb or perimeter trim to length as required. Apply foam tape or PermaRoof Bond & Seal to the underside where it meets the membrane to create a watertight seal when compressed.
Trim the membrane so no more than 50mm overhangs the perimeter. Starting at a corner, fold the excess away then position the trim and fix securely using the 7mm pre-drilled slots at 300mm centres. Use trim clips to join lengths and cap off ends and corners.
Apply a bead of sealant where required as you go, and you’ll be left with a clean, professional, fully watertight finish ready to withstand whatever winter throws its way.
Step 5: Final checks
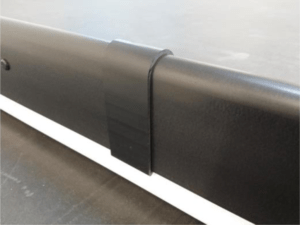
Inspect all edges, corners and outlets. The result should be clean, crisp and secure.
Once completed, the benefits are immediate and long-lasting:
- The membrane is fully protected at the edges
- Wind resistance is significantly improved
- Rainwater runoff is managed effectively
- The roof looks complete and professionally finished
- The lifespan of the waterproofing system is extended
Edge trims are an easy-to-fit detail that work continually hard.
If a roof refurb or upgrade is on your list for the New Year, plan edge trim in from the start. It’s far easier (and far better for performance) to install it as part of a full EPDM replacement than to try and retrofit later.
❤️ Your Finished Roof, all Wrapped Up
As we approach the final projects in our 12 Projects of Christmas series, we’re focusing on quality, longevity and that all-important finishing touch. After all, Christmas dinner without the gravy just doesn’t hit the same.
An untrimmed roof is no different – so make sure the PermaRoof trim system makes it onto your festive checklist.
Related News from the PermaRoof UK Blog

🎄 EPDM: The Unsung Hero Above the Fairy Lights
It's the night before Christmas and we've reached the end of our feature - thank you for staying with us, we hope you've enjoyed them as much as we have. If you've sprinkled any DIY magic of your
Impress Santa with a Properly Finished Flat Roof
As we approach the final projects in our 12 Projects of Christmas feature, we’re focusing on quality, longevity and that all-important finishing touch. After all, Christmas dinner without the gravy just doesn’t hit the same. From elf-budget

A Lantern for Life, Not Just for Christmas
We're approaching Christmas, and the end of our 12 Projects feature with just two days to go! We hope we've added a sprinkling of DIY magic and a sleigh-load of inspiration to your festive calendar. Here is an
Get in Touch
Please leave your details and someone from the PermaRoof UK team will be touch shortly to help you with your enquiry.
Permaroof UK® Ltd
Unit 1
Westway
Cotes Park Industrial Estate
Alfreton
Derbyshire DE55 4QJ
Tel: 01773 608 839
Fax: 01773 608 408
Email: Click here
Registration No. 4109502
VAT No. 764 2785 00
Permaroof (UK) LTD
Opening Hours
Mon – Fri (8am / 5pm)
We are closed on bank holidays and we re-open the following working day at 8am. Feel free to send us your enquiry during these periods and we can get back to you.
CONTACT PERMAROOF UK
PermaRoof UK are on hand to answer any questions regarding our products, services or your order. We welcome enquiries from the trade, stockists and homeowners alike. Contact PermaRoof UK today using the below form and one of our experienced team members will be on hand to help you right away.
Permaroof UK® Ltd
Unit 1
Westway
Cotes Park Industrial Estate
Alfreton
Derbyshire DE55 4QJ
Tel: 01773 608 839
Fax: 01773 608 408
Email: Click here
Registration No. 4109502
VAT No. 764 2785 00
Permaroof (UK) LTD
PermaGroup Brands, Partners and Clients
PermaGroup has established links with some of the biggest names in our industry thanks to our reputation of excellence. Read more about becoming a supplier or stockist here.


